Monday, July 30, 2012

Feel Tips - Fast Insert Excel Workbook Header or Footer to Every Sheet


A header or footer can be easily inserted to an Excel sheet through Excel’s Page Layout view. But when you need insert a same header to several or even all of the worksheets in Excel workbook, this could be a heavy repetitive work. However, you don’t have to insert a header or footer individually to every worksheet if you can group them. Continue reading this post, you will learn a fast solution to insert header or footer to every worksheet in workbook.

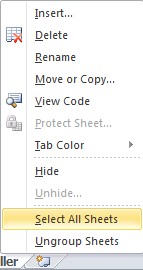
First, group all of the sheets. Right-click a sheet Tab and choose Select All Sheets from the resulting shortcut menu. It’s an easy trick for most Excel users to group all of the worksheets. 


Then, in the bottom-right, click the Page Layout button. Now we are in Page Layout view. Page Layout is new to Excel 2007. If you are using Excel 2003, you can choose Header and Footer from View menu.


Now you will find an area called “Click to add header” and you can enter your header there. The layout view supports the left, center, and right sections. Then, you can fully control the header at your will. If you want to display the sheet name, you can click Sheet Name in the same group. 


When you finish inserting header content, click any of the sheet tabs to remove the grouping. As you move from sheet to sheet, you’ll find that they all have the same header. This trick works inserting footers either. Here I want to give you all a friendly reminder. Headers or footers are visible only in Page Layout view and in Print Preview.

Wish this trick can save you a lot of time on your daily work. If you need repeat a task on multiple or all worksheets, you can group them together. 


Feel Tips - Print Word Section Setup


The print feature of Microsoft Word offers a lot of flexibility. But there is no direct solution to print Word sections. However, there’s one trick most of us might not know can help you do it. If you know the section’s number, you can print that section. The secret is to combine the section number with the characters in the form ssectionnumber. But how to know a section’s number in Word document?

Luckily, there’s an easy method to know a section’s number. Right-click the status bar and check Section. In the status bar, Microsoft Word will display the Section indicator. That’s the number we need.  In Word 2003, this indicator is shown by default. 


After we get the section number, we need position the insertion point in the section which we want to print to update the indicator accordingly. Then, follow the steps below to use the number in print string.
  1. Click the File tab and click Print in the left pane. (Choose Print from the File menu in Word 2003)
  2. Choose Print Custom Range from the first setting’s dropdown. (You don’t have to choose anything in Word 2003; just enter the section code in the Pages option in the Print Range section.
  3. Preface the section name with the s character. For instance, to print section two, enter s2.
  4. Then, click Print. (In Word 2003, click OK.)


By using this trick, we can also combine this section-printing code with page numbers. Just separate the page numbers with comma characters. For example, to print page 3, section 4, and pages 13 through 15, we need to use the following string: 3, s4, 13-15

Feel Tips - Fast Exchange Word to PowerPoint by Using Styles


Because of a bit confusing, some Word users dislike using styles. But usually, styles come in handy and even the most basic users can benefit from them. For example, if you’re lucky enough to have presentation information in a Word document, you don’t need to start from scratch to build your presentation. You can just start with Word. By using Word styles, we can create a presentation either. This can save lots of time for all of you.

The key to successfully do this job is preparing the Word document before opening in in PowerPoint. Because PowerPoint only use text formatted with the default heading styles, here I recommend work with a copy of the document. Now, follow the instructions below to prepare the Word document.
  1. Create a copy of the document.
  2. Apply Heading 1 to slide titles.
  3. Apply Heading 2 to bullet points.
  4. Apply Heading 3 to text which you want included with each bullet point. It’s unnecessary to add bullets in Word because PowerPoint will do that for you.
  5. Save the Word document and close it.
After finish preparing job, then open the Word document in PowerPoint. Based on the heading styles, PowerPoint will automatically create slides. Don’t worry if you won’t get it right at the first time.  Most adjustments will be obvious to you:
  • PowerPoint created three slides based on two styles: TOC Heading (Contents) and Heading 1 (Galleries and Using Galleries). The formatted text is also the slides’ titles. If you want to keep the Contents slide, you might want to adjust its style to match the other two slides. Or, you might want to remove the heading style to exclude it from the presentation. If you want to include the table of contents text, apply the appropriate heading style.
  • PowerPoint used the Heading 2 text under each Heading 1 text as bullet points for each slide. With a bit of preparation, those are correct as is.
  • PowerPoint used the Heading 3 text to create a second bulleted layer. You might want to leave as is, or reformat in Word by including a hard return to reposition each specific bullet. In addition, you’d probably want to shorten each statement.

After shortening the text and adding hard returns to the Heading 3 text, PowerPoint will automatically create a slide from Word document. If it’s possible, work from a copy of the document, which can help you make the adjustments freely.

In addition, if there are graphic files, you need insert those separately because PowerPoint won’t import them from a Word document.


By using this Word tips, you can fast exchange Word to PowerPoint. For this time-save behavior, it’s worth learning some more about styles.